Installation
The uBug12JE installer can be downloaded from the Technological Arts archive site at:
http://support.technologicalarts.ca/docs/uBug12
There are two variations of the installer. The 'jar' file is a standard Java archive file, and can be used to install uBug12 onto a Mac or Linux system. The 'rar' file is an archive that contains an executable to be run on Windows systems to perform the installation of uBug12. This is required for Windows 8, 8.1, and Windows 10. You will need to extract the executable using the Winrar archive utility at:
http://www.rarlab.com/download.htm
The uBug12 installer program will need to be saved to your computer hard drive and then run. On Windows systems, it will install uBug12 under' Program Files' or 'Program Files(x86)' on the C: drive by default. It will also install in the corresponding default directories for Mac and Linux systems.
Windows installation will require accepting the prompt asking you to allow the program to make changes to your system.
Once the program is installed, a shortcut to the program will be added to your desktop. This will make starting it up easier.
uBug12 works best with the latest version of the Java JRE installed. (i.e. Java 6 Update 30 or later) When you upgrade your JRE, you MUST uninstall all older JRE versions first!
uBug12 requires the use of the RXTX library to function. This library allows uBug12 to use a Serial Port to communicate with an S12(X) MCU. USB-to-Serial converters are fine to use as well. Your system must already have its native drivers installed to use the serial port for general communication. RXTX just allows Java to access that native OS driver. If there is an issue getting connected, you may need to install this library manually onto your system. (See: http://rxtx.qbang.org/wiki/index.php/Main_Page)
The installer can attempt to install the RXTX library for you. There are several variations available, so if one does not work, uninstall uBug12 and reinstall with another version. If none of these work, try installing it manually onto your system. (You can deselect installation of the library in the installer to do this.)
Linux installation may require RXTX be installed manually by the root account. For Ubuntu, installing the librxtx-java package should be enough.
uBug12 also uses the Serial library from Processing. (Copyright (c) 2004 Ben Fry & Casey Reas) This is released under the GNU Lesser General Public License, as published by the Free Software Foundation. The modified source code has been included so you can see what was changed, and are free to change it further, if you wish, for your platform.
Windows:
ALL - If USB-to-Serial is being done, first plug in the USB cable between the computer and the S12 board. Windows will prompt that it has found new hardware, and is searching for a driver. On Vista, this Microsoft Update for the driver will seem to take forever. Be patient.
XP - Works well with standard RXTX install.
Vista - Works with RXTX 2.2 Prerelease.
Windows 7 Starter - Works with RXTX 2.2 Prerelease.
Windows 7 for 64 bit - Works best with the default 32 bit version of the Java JRE installed, and 32 bit RXTX drivers, such as the Prerelease 2.2 version. (The default JRE is 32 bit because the default browser used is the 32 bit version of IE.) Reliability issues have occurred with the 64 bit JRE and 64 bit RXTX on some systems. Again, this is not an issue with uBug12 itself.
Windows 8.1/10 - One has to use the executable in the 'rar' archive to install uBug12 with Administrator permissions. You will have to create a project to be able to save any configuration changes.
Mac: You may need to install RXTX manually.
Linux: Be sure there are native drivers installed first for the serial port, especially if it is a USB-to-serial port. Also, you will need to manually set the execution bit on the shortcut for it to be able to run the program when clicked.
The program can be started without a module connected to the computer, and it can be useful to do this just to see the program run. With the shortcut as explained above, just double-click on the icon to start the program. You will see a flash page with the Technological Arts logo for a couple of seconds, before the main program starts up. If it starts correctly, you should see a program window as shown below. Otherwise you will need to review the steps taken previously to install the program. If there is a problem, try uninstalling the program, re-downloading it, and reinstalling. This should take care of most issues.
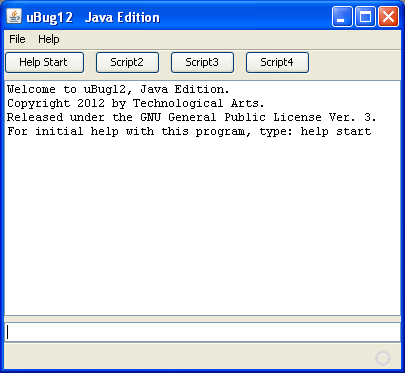 |
The program screen has four sections. At the top is the Menu bar, containing the menu words File and Help. Underneath that are four buttons that can be configured to run user-defined command scripts. (This is described later.) The main part of the window is the text output box, where uBug12 types the results of running commands. At the bottom of the window is a one line text input box. This is where you type commands for uBug12 to execute. The program can be terminated by one of the following actions:
|